Flutter: Burying the Hatchet with Build Runner Once and for All

Are you a Flutter Developer? Do you use build_runner for code generation? Are you tired of typing or remembering the anaconda sized build_runner command? Do you want to get rid of that? Then you’ve come to the right place.
Almost every Flutter project uses code generation nowadays. Who wouldn’t? No one likes to write boilerplate code by themselves. It is exhausting and is kind of stupid at some point. That’s why Flutter devs love build_runner(Maybe not, I don’t know). The power you feel when you make the computer write code itself is incredible, isn’t it? But with great power comes great responsibility and it’s nothing different with build_runner.
flutter packages run build_runner build --delete-conflicting-outputsI don’t need to ask whether you’re familiar with this command or not at this point. If you’re not, you wouldn’t be reading this! This is the command that does all the code generation. But I gotta admit that this is quite a long command to remember! Even if you succeed in doing that, it’s very exhausting to type this command several times a day as being a Flutter developer. I am kind of lazy to do it manually over and over! It kind of feels stupid to me!
That brought me here. It got me thinking of some way to avoid typing it or remembering it in the first place. You might be thinking that why not use aliases. For a Linux or Mac system, it is very easy to set and use aliases. You define a nice little alias for this command and use that instead of typing the whole command.
alias build_runner='flutter packages run build_runner build --delete-conflicting-outputs'Well, it seems better but not the best. First, this is not easy for Windows users. It kind of sucks for them. Second, You still have to type that alias name, right? You’d open your terminal, type your little alias and hit enter. Well, I am even lazier to do that, I don’t even want to type that!
What if we can use a shortcut to execute build_runner commands as we do for running our app in Android Studio. We hit ctrl + R on Mac and the Android Studio runs our app for us. Isn’t it nice? I would very much like to have similar functionality for build_runner commands as well.
So, I started digging and found some mojo to make it work the same as the run project shortcut works. And that led me to write this article and share that mojo with you guys! Let’s bury the hatchet with build_runner once and for all!
What do we want exactly?
We want some shortcuts to run build_runner commands neatly in our IDE. Whether it be Android Studio or VS Code. You heard that right! For VS Code as well. Android Studio and VS Code are the IDEs that are used mostly for Flutter development. So I decided to provide a workaround for both of them. Keep Reading and I’ll show you how you can achieve that!
# Windows: Ctrl + Alt + G
# Mac: Cmd + Option + G
flutter packages run build_runner build
# Windows: Ctrl + Alt + H
# Mac: Cmd + Option + H
flutter packages run build_runner build --delete-conflicting-outputsI am going to use these shortcuts for this demonstration. You’re free to choose whatever suits you.
VS Code Setup
Well, VS Code trick is easy and straight forward than Android Studio. We’re looking for a way to bind a shell command with a keyboard shortcut. Honestly, we can’t do it directly in VS Code. Not without any plugins. Yes! you guessed it right! We’ll need a specific plugin in order to achieve this.
Installation
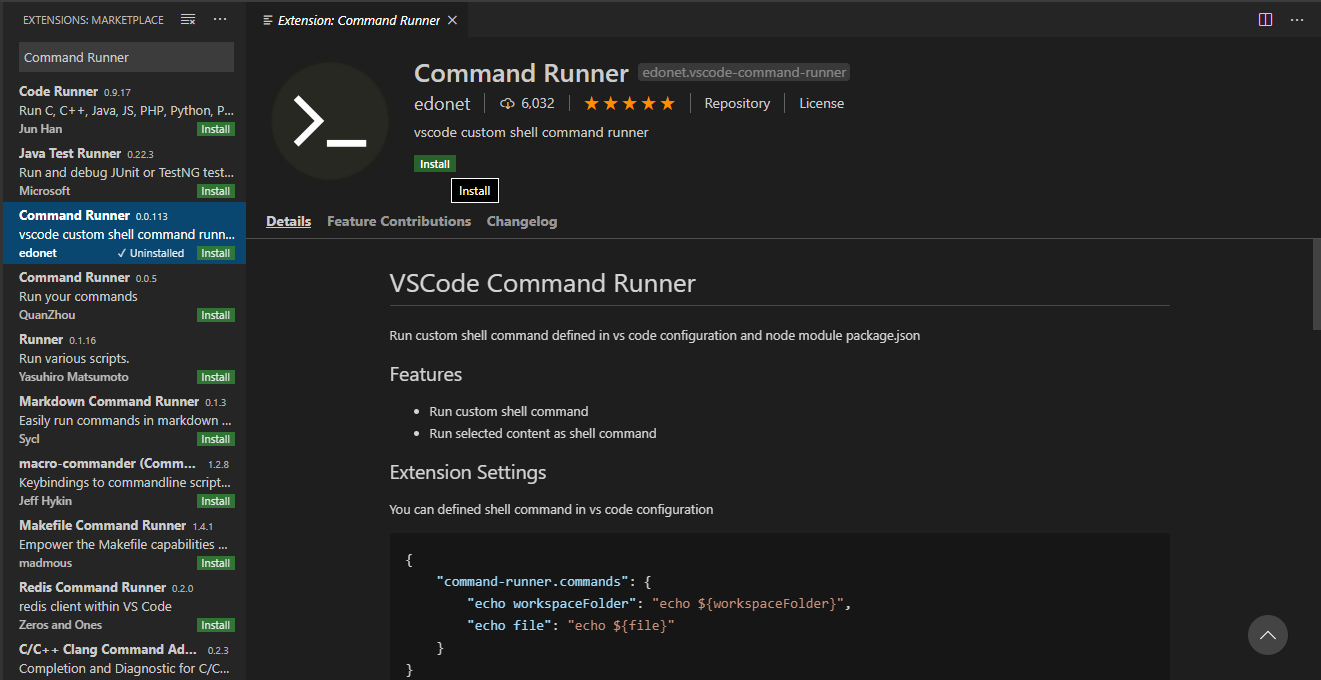
That plugin is Command Runner. Go ahead and install it from the marketplace. It allows us to bind shell commands with keyboard shortcuts.
Set Key Bindings
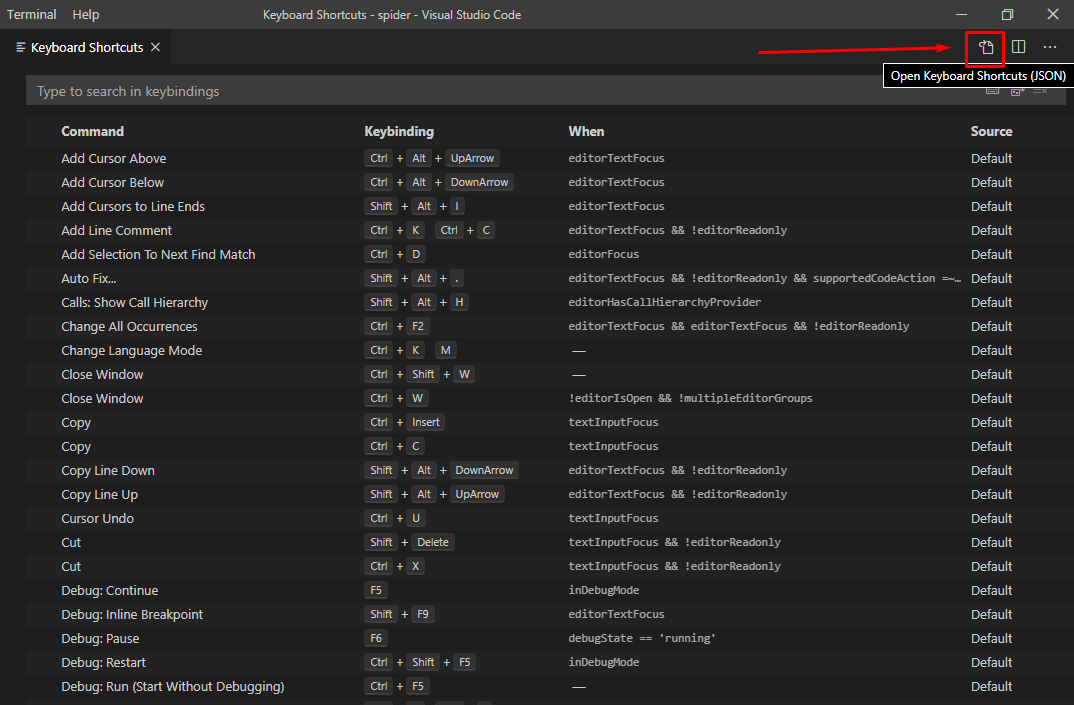
Now that we have the above plugin installed, we need to set a keyboard shortcut and assign a shell command to it. To do that, go to File>Preferences>Keyboard Shortcuts or press ctrl + k ctrl + s on Windows or Linux. For Mac, go to Code>Preferences>Keyboard Shortcuts or press cmd + k cmd + s.
This will open GUI for key bindings file for VS Code. We need to open it as JSON File. Click on the left-most icon on the top-right side of the Editor window.
You might or might not have some entries in this JSON file. Add the following JSON at the end of the file in the JSON array as shown below.
[
  ...
  {
    "key": "ctrl+alt+g",
    "command": "command-runner.run",
    "args": {
      "command": "flutter packages run build_runner build"
    }
  },
  {
    "key": "ctrl+alt+h",
    "command": "command-runner.run",
    "args": {
      "command": "flutter packages run build_runner build --delete-conflicting-outputs"
    }
  }
]
Replace
CtrlwithCmdandAltwithOptionon Mac.
Notice that "command": "command-runner.run" indicates to use the plugin that we just installed to run our commands. Save the file once you’re done editing it. That’s it. That’s all you need to do! Now you can run your build_runner command from anywhere, anytime and for any Flutter project without even typing a single word!
Amazing right? Open a Flutter project and give it a try! Once you hit the keyboard shortcut, it will automatically open the terminal and will run the specified command.
You can set shortcuts for running build_runner watch commands as well. You can run any command you want with this configuration. Be creative!
Android Studio Setup
This part is a bit tricky. Unlike VS Code, we won’t need any kind of plugin for this because it is built right into the Android Studio. We’re going to use a feature of Android Studio called External Tools. It allows us to define shell command.
To open the External Tools window, go to File>Settings>Tools>External Tools. For Mac, go to Android Studio>Preferences>Tools>External Tools. Hit the + icon to add a new tool.

It will open a dialog to add a new external tool. You can choose the name of your choice. I choose Build Runner Build. This name will be shown in the Android studio when you want to run it from the UI.
Under the Tool Settings section, the Program field will need an executable to call. It will be the Flutter executable for your OS from Flutter SDK for. Which means <flutter_sdk>/bin/flutter for Mac or Linux and <flutter_sdk>/bin/flutter.bat for Windows.
Arguments field will be the build_runner command omitting the flutter keyword as shown below which is packages run build_runner build in this case.
You can leave Working directory field empty and it will run the command at the root of the project or you can add a macro pointing at the root of the project which is $ProjectFileDir$.
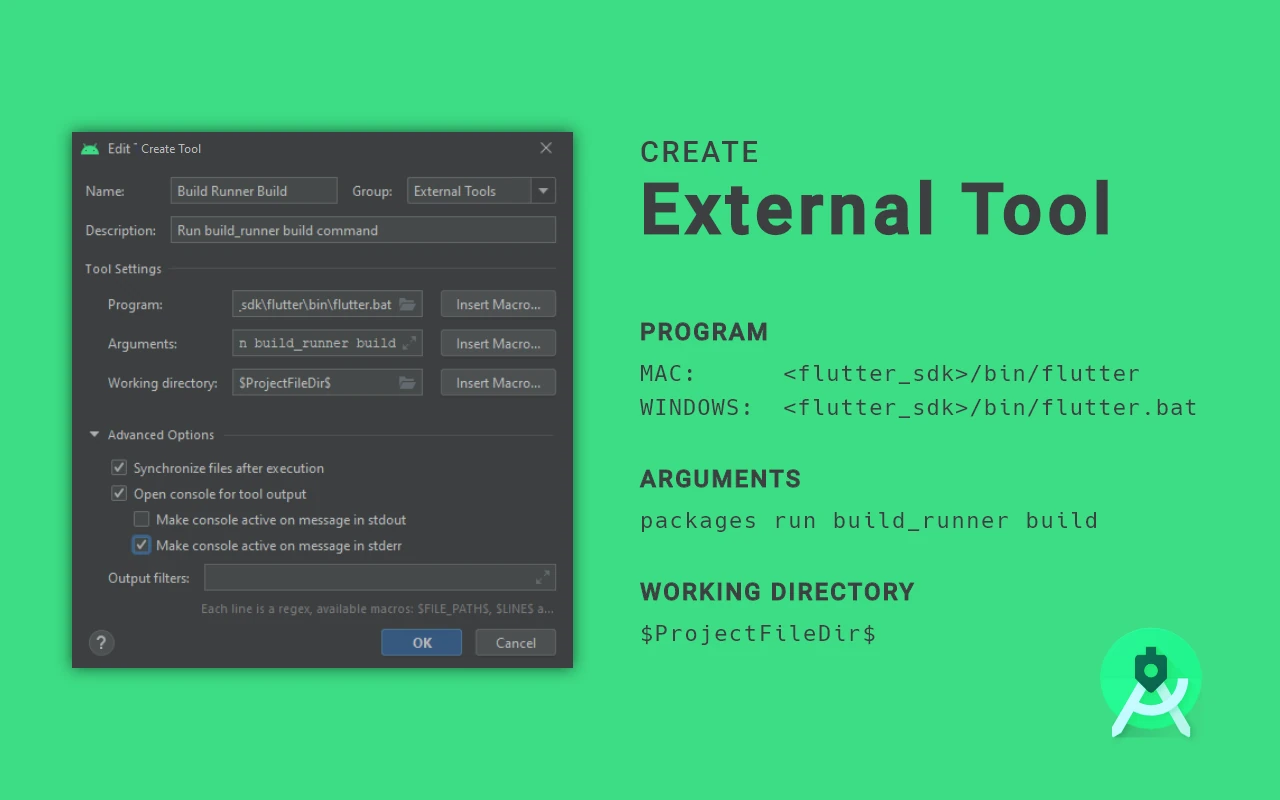
If you select Make console active on message in stderr checkbox under Advanced Options, it will open the console window running the build_runner automatically when it throws an error. Once you fill all the required information, save it and exit the settings.
We have successfully created our External tool. At this point, the only way you can run this newly created tool is from Tools>External Tools>tool_name. where tool_name is the name you gave when creating the tool. This will successfully run our build_runner command in a new run window. Go ahead and run it from the UI to make sure it works as intended.
The only step left is to assign a keyboard shortcut for our newly created external tool. To do that, open Studio Preferences again and go to Keymap section from the left panel.
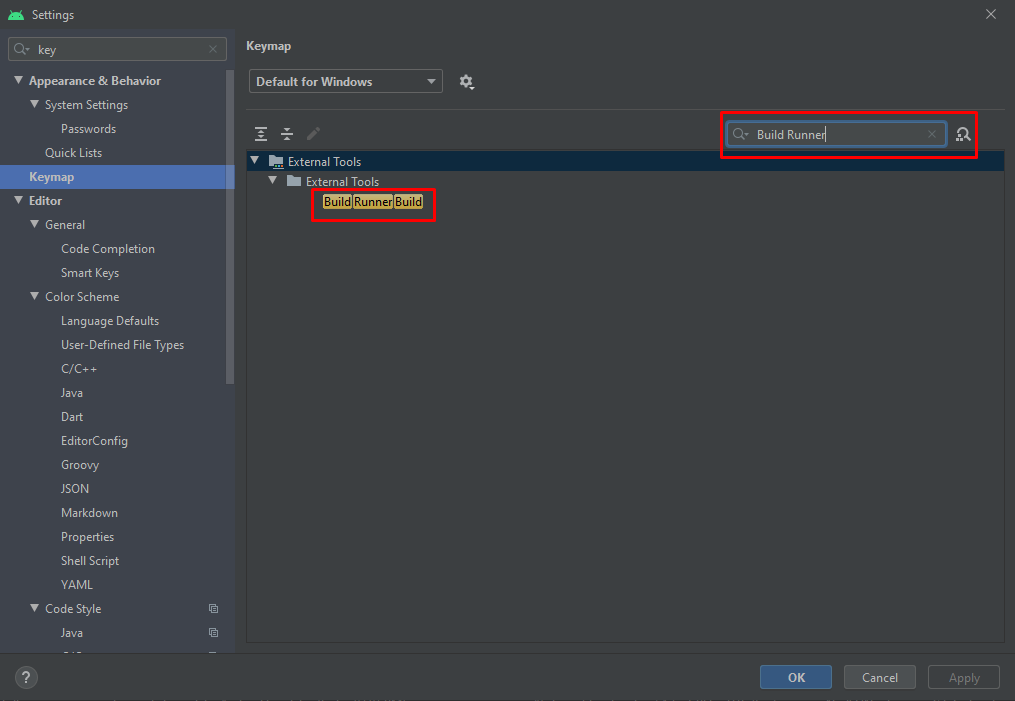
Right-click on the external tool name and select add keyboard shortcut. Add the shortcut Ctrl + Alt + G or whatever combination you prefer and save it.

That’s it! You are all set up. Now you never have to type that commands again! Just use a shortcut and you’re good to go!
I have created just one command to show you guys how to do it. You can create other combination of build_runner commands for build and watch type of commands with --delete-conflicting-outputs flags. This solution works for every other Flutter project.
Thanks for reading! If you liked what you read, don’t forget to share this article as much as you can and help fellow devs. Happy coding folks!